Outbound
10 Steps To Book 20-40 Meetings Every Month with Cold Outbound

1 / Define ICP
Define your ICP at the...
- Account-level (firmographics, technographics)
- Person-level (user, decision-maker, approver)
Firmographics
This includes:
- Industry
- Employees
- ARR / revenue per year
- Funding
- Locations
Technographics
This includes:
- Technologies they currently use
- Technologies they are investing in
- Technologies they want to invest in
Personas
For user, decision-maker and approver, you want to define the following for each:
Demographics:
- Job-title
- Seniority
- Department
- Years of experience in company or role
- Education
Psychographics:
- Pain-points
- Goals
- Fears
- Values
- Interests
- Habits
- Attitudes
- Beliefs
- Motivations
- Priorities
- Preferences
Prefer to watch? Full video breakdown below:
2 / Build Your Offer
For each product / service, you want to define:
- Target audience (segment of ICP that applies)
- Problem (biggest, hairiest problem, root causes and cost of inaction)
- Dream outcome
- Buying triggers
- Signals (both account-level and person-level)
- Solution (your solution to the problem that results in dream outcome)
- Benefits
- Pricing
3 / TAM Mapping
- Create TAM Master list (account-level and person-level)
TAM Accounts
- Define filters based on ICP
- Pull data from various sources (Apollo, Ocean, LinkedIn Sales Navigator, etc)
- Merge and dedupe in Clay (using company domain as unique identifier)
- Use claygent to enrich and filter out non-ICP (using HTTP API costs 0 credits)
- The result gives you your TAM master accounts list
TAM People
- Upload the TAM accounts list to Apollo to find people with the following roles: a) user; b) decision-maker; c) approver (if same person covers multiple roles that's fine - expected in smaller companies)
- Dedupe (if non-unique)
- The result gives you your TAM master people list
4 / Calculate No. of Domains & Inboxes
- Determine number of emails to send per month
- Determine number of domains and inboxes to setup
Monthly Sending Volume
- Determine your TAM coverage cycle (recommend 3 months i.e. reach out to your entire TAM every quarter)
- Determine number of prospects to sequence per month (TAM people divided by TAM coverage cycle)
- Determine number of emails per sequence: a) if TAM is between 5k and 20k, use a 4 email sequence; b) if TAM is between 20k and 70k, us a 3 email sequence; c) if TAM is greater than 70k, use a 2 email sequence
- Then calculate number of emails per month (number of prospects to sequence per month × number of emails per sequence)
No. of Domains / Inboxes
- Max. 2 inboxes per secondary domain
- Max. 25 emails per inbox per day (50 per domain per day)
- Max. 20 sending days per month
- Double the domains (excl. backups) to get total domains (incl. backups)
- Use the look-up table below to work out total number of domains and inboxes

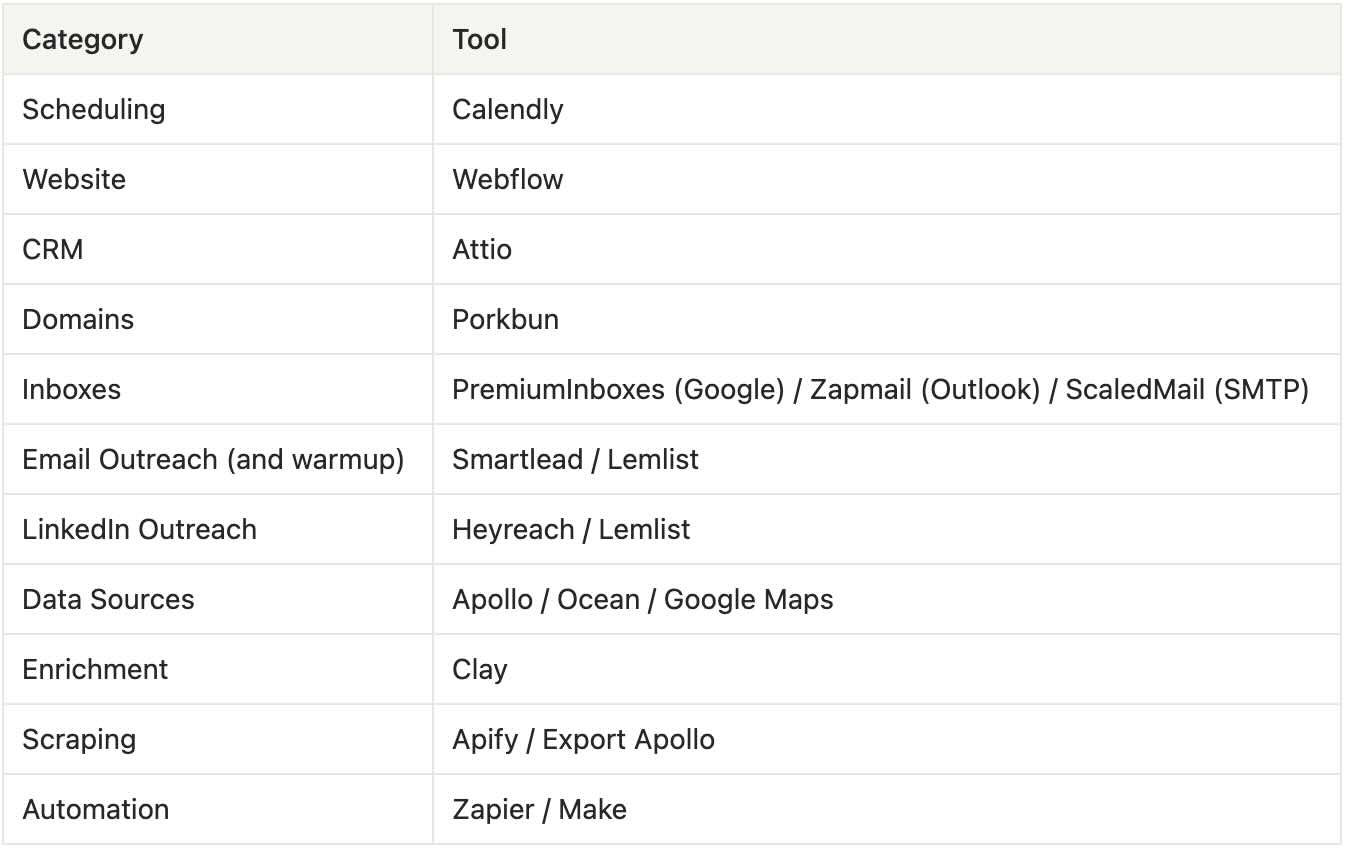
5 / Tech Setup
- Purchase and setup tech
- Here's the tech stack we use (feel free to copy it)
6 / Email Infrastructure
Follow this infrastructure best practices checklist (to ensure high deliverability):
✅ Setup Secondary Domains
- Create variations of primary domain
- Purchase from reputable providers like Porkbun
- Stagger domain purchases
- Calculate domain needs based on monthly sending volume
- Stick to .com domains
- Avoid black-listed domains
- Buy back-up domains
✅ Inbox Configuration & Management
- Set up 2 inboxes per domain
- Use trusted re-sellers like PremiumInboxes (Google), Zapmail (Outlook), ScaledMail (SMTP)
- Diversify your sending infrastructure e.g. 50% google, 30% outlook, 20% SMTP
✅ Email Authentication and DNS
- Configure technical records including: SPF, DMARC and DKIM
- Setup URL re-directs from secondary domains to main website
✅ Gradually Warm-up New Inboxes
- Set warm up settings to start at 5 per day, increase by 1 email per day up to 15-20
- Set warm-up reply rate to 70% before scaling further
- Use warm-up tools like Instantly, Smartlead or Lemwarm
✅ Sending Volumes
- When warm-up is complete, send maximum of 25 cold emails per day per inbox
- Ensure warm-up stays on at 10-15, 70% reply rate
- When starting cold email campaigns begin with 5 cold emails per day in week 1 and gradually increase to 25 emails per day by end of week 2
✅ ESP Matching
- Send Outlook to Outlook, Gmail to Gmail for greater deliverability
✅ Create Signature with Unsubscribe Option
- Include a note at the end of the signature with the option to unsubscribe
- E.g. “If you do not want to receive my emails, just reply “unsubscribe”
7 / List Building
TAM List to Execution Lists
- In step 3 (TAM Mapping), we created a TAM accounts and people list
- Now we want to split the TAM people list into 3 execution lists (List 1, List 2 & List 3)
- You can separate by geo, company size, revenue range, as well as others filters
- Then you can reach out to List 1 in month 1, List 2 in month 2, List 3 in month 3 (covering your full TAM in 3 months)
- You will want to keep track of your TAM list and execution lists in a Notion table or spreadsheet
8 / Copywriting
- Write copy for initial campaigns. It's recommended to run 3 campaigns, with 3 message variants per campaign
- Follow this copywriting best practices checklist (to ensure high deliverability):
✅ Plain Text Only
- No links, no attachments, no HTML
- Plain text emails to avoid spam filters
- Turn off open and link tracking (as this contains HTML)
✅ Subject Lines & Email Body
- Avoid spam trigger words like “free”
- Use Smartlead’s Spam Word Checker
- Keep subject lines non-salesy
✅ Spintax / AI
- Spintax: Rotate words/phrases to create unique variations. Example: Hi {Jack|Simon|Oliver}, {Hope all is good|Hope you're well|Hope this finds you well}
- For more personalization, send fully AI-generated emails based on real data
✅ Encourage Engagement
- Ask questions or personalize to increase reply rates
- Avoid sending mass identical emails, which trigger spam filters
✅ Test & Optimize
- A/B test different subject lines, openings, and CTAs. Find winner, then A/B test on the winner. Repeat
9 / Enrichment
- Use Clay
- Enrich with unique data (ICP, signals, etc), clean and filter
- Double-verify email lists (ZeroBounce for initial verification, BounceBan for catch-alls)
- Create personalized subject lines and email body by combining pre-written copy in Step 8, with enriched ICP and signal data as variables
- Send to sequencing tool when finished (Smartlead for email, Heyreach for LinkedIn)
10 / Launch & Manage Campaigns
- Pre-launch checklist
- Launch campaigns
- Handle replies
- Monitor key metrics
- A/B Test
- Track positive replies
- Run placement tests
Pre-Launch Checklist
- Complete the pre-launch checklist (already covered above but go through again just to make sure):
✅ Inbox Setup & Client Management:
- Add client tag to each inbox (if launching campaign for client)
- Tag each inbox with source (e.g. Premium Inboxes)
- Add client to the campaign (if launching campaign for client)
- Add email signature to every inbox: Name, Title, Spintax
- Add unsubscribe option to every inbox
- Add blocked domains and email addresses to client blocklist
✅ Send Volume & Warm-up
- If using new inboxes, start at 5 emails/day
- Gradually increase sending volume to 20 emails/day over 2 weeks
- Set warm-up to 70% reply rate, 10-15 total warm-ups daily
✅ Campaign Settings
- In your Smartlead campaign settings, recommend you toggle on the below:
- Stop sending messages when lead replies
- Optimize for email deliverability
- Turn on “Send email as plain text”
- Enable “Don’t track opens and links”
- 50% follow-ups, 50% new leads
- Do NOT enable enhanced email sending
- Send to all
- Intellicategorize responses using: Do not contact, Wrong person, Interested, Meeting request, Not interested
Launch Campaigns
- Launch 🚀
Handle Replies
- Manually respond
- Reply from same email until after the call, then change to primary email (ensure continuity)
Monitor Key Metrics
- The metrics below you should track
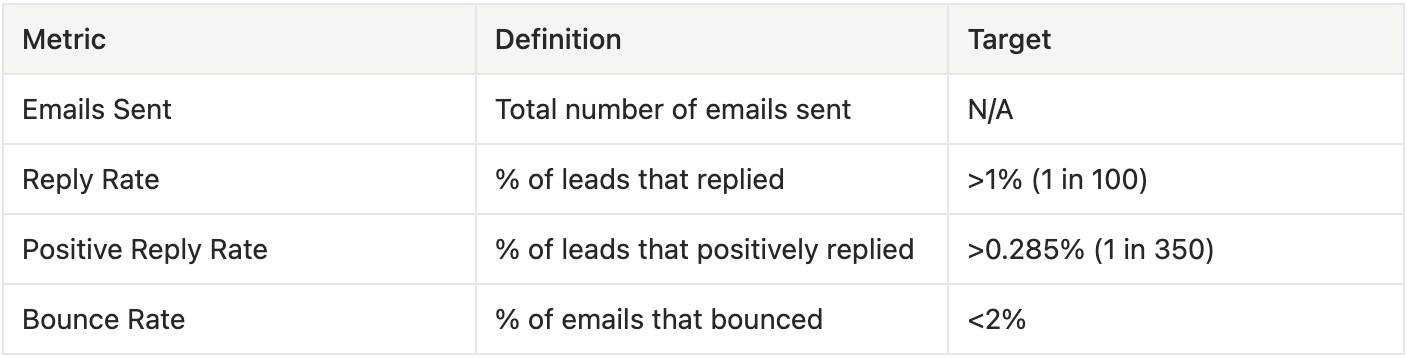
- Do not track open rates or click through rates because they add HTML which harms deliverability.
A/B Test
- A/B test, find the winner, then A/B test the winner. Repeat
- Messaging fatigues over time, so you'll want to continuously A/B test
- Recommend 3 variants per message, across 3 different campaigns
Track Positive Replies
- Track positive replies in a Notion table or spreadsheet
Run Placement Tests
Run automated placement tests twice per week for every campaign
Takeaways
- In just 10 steps, you can book 20-40 meeting every month, and take back control of your pipeline.